Wednesday 26 March 2014

To Logan, On Your First Birthday

To my little Logie-Bear,

Let's not even start with what a year it has been. What a March 2014 it has been. It was exactly 24 days and 12 hours ago that you burned your beautiful soft chubby little hands on the steam vaporiser in your bedroom and turned our hearts and world upside down. You were so brave and so strong and never changed from the amazing little man that you have always been. You continued to charm everyone around you. You still loved us more than 100% even when we felt like we didn't 100% deserve it. Because of you, we all came through this stronger and more aware of how lucky we are to still have you with us.

You had a wonderful first year my little man.

You met your big sister.

You had your first Easter.

You had your first trip to the pub.

I just couldn't resist sharing this photo.

Or this one.

You had your 1st hair cut.

And your 1st Christmas.

And today you had your 1st birthday!

You have the most incredible personality. Already so friendly and so full of life. Your sister loves you so much and is learning to share her toys with you. You follow her around everywhere and I think (secretly) she loves it. I love watching you play together and know that you will always be there for each other.

We are so lucky to have you Logie Bear. Love Mumma Bear xxox

To Isla, On Your Second Birthday

To my beautiful Isla Skye,

Today you turned two and although that might not seem like a lot to some people, to me it means a lot. Every day you amaze me and to look back on the past 2 years, I just can't believe how much you have grown. I know that sounds cheesy because I'll probably say that every year. But it will be true every year. And I have no doubt that you will continue to amaze me every year that you grow brighter and stronger and more beautiful.

This past year has been a whirl-wind. First and without much warning you welcomed a baby brother.

Soon after, you gave up your favourite mode of travel (speed-crawling) and learned how to walk and talk.

You learned how to be a big sister.

And you tried new foods.
You had your 2nd Christmas.
And your 2nd Cake Smash.
And today, you had your 2nd birthday.
I'm so proud of you.
* * * * * * * * * * * *

Every day is a new day when you tell me or show me something new that you have learned. Even when I catch you doing something you know you shouldn't. When you look up at me and you sheepishly say "hello mum". Those two words are more precious to me than you know at the moment while you're learning how to talk. You probably won't ever remember so I'll tell you that it was only 3 nights ago that I tucked you into bed and you took your dummy out of your mouth (a momentous task) and put your hands on my cheeks and said "I love you mummy". It was really precious because a) you rarely take your dummy out of your mouth once you have it, and b) for so long you have only whispered the words after I have asked/begged/told you to say it. In that moment I felt more like your mummy than I ever have before.

Yesterday I was reminded of how little time we have had with you and how lucky we would be to have the rest of our lives. It was at the supermarket. You were asleep in the pram (I have no idea how you slept through all that noise!) and Logan was charming a lovely lady in the line for the checkout. She asked your ages and I told her about your birthdays tomorrow. Later she wished you both a happy 1st and 2nd birthday and told us that her babies were in their 50's now. And she was shaking her head, grateful I'm sure for the years and the memories. And as your dad and I walked back to the car, we were reminded again of how lucky we are to have you and how lucky we would feel to have the next 48 years and more with you.

You are so cherished my baby girl xx Love Mumma


Tuesday 25 March 2014

Tutorial Tuesday --> Easy No-Bake Mini Raspberry Cheesecakes With Fresh Raspberry and Gold Leaf Decoration

Easy No-Bake Mini Raspberry Cheesecakes With Fresh Raspberry and Gold Leaf Decoration by Rhapsody and Thread

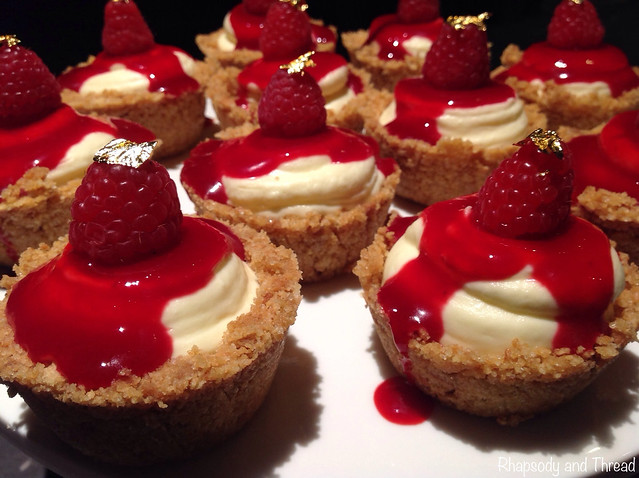
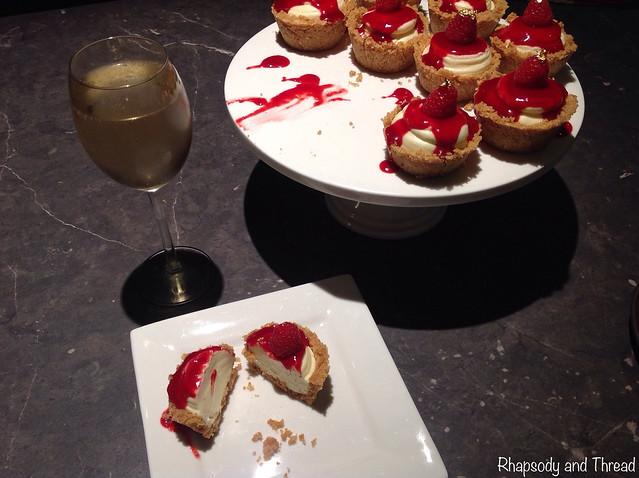
For weeks and weeks I searched for the perfect dessert to make for Justin's birthday dinner. It's a big birthday (I'll keep the exact details... cough/40... to myself) so I wanted to make him something special. I knew it would have to be a cheesecake. He always orders the berry cheesecakes when we're out, and I've seen the most luscious looking raspberries in the supermarket recently - so I thought I would attempt a raspberry cheesecake for him. And homemade cheesecake is SO delicious!

I went hunting for a recipe and found this stunning recipe by Ashley at Spoonful of Flavor who guest posted for Carrian at Oh Sweet Basil. Both of these food blogs are AH-mazing and I was so impressed with how easy it was to make these little beauties. Great job Ashley and Carrian!

I wanted a 'no-bake' option and I loved the look of the 'mini' adorable little portions. I also loved the combo of creme fraiche, cream, and cream cheese --> YUM! So I just had to try this recipe.

The instructions were easy to follow and the results were as delicious as they look in the photos.

The only downside was that it didn't take me 20 minutes to prepare (like the recipe says) because I had to convert the American measurements to Australian. So in sharing my attempt at these mini cheesecakes, I have kind of shown an Australian conversion. I have kept as close to the measurements as possible, only converting sticks and ounces to grams. And I shared the Australian version of ingredients such as 'digestive biscuits' instead of 'graham crackers', 'icing sugar' instead of 'confectioners sugar', and 'cornflour' instead of 'cornstarch'. These changes did not affect the look or the taste of these gorgeous little gems.

So here's how I went!
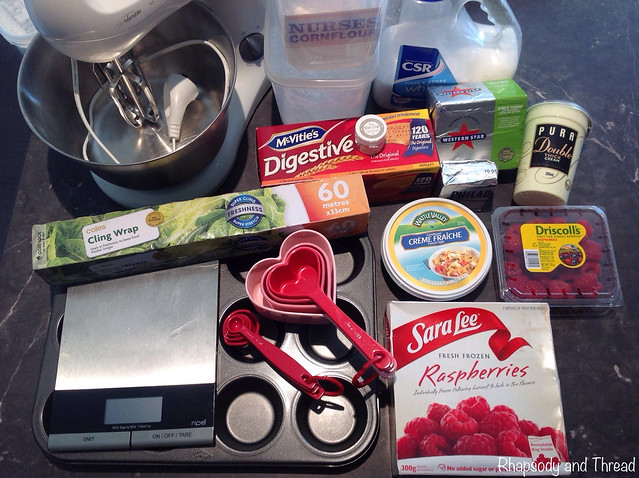
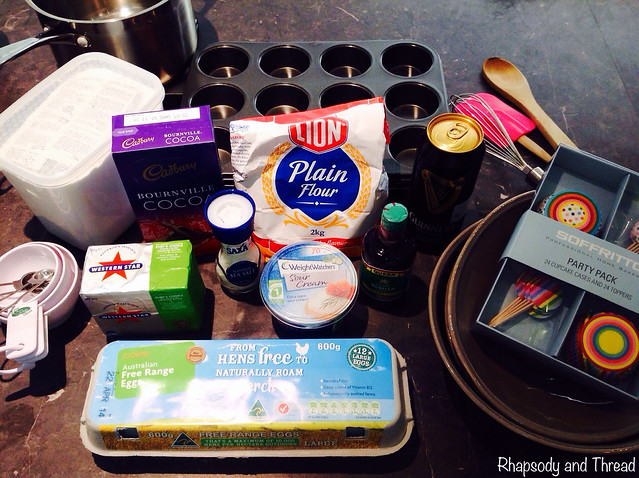
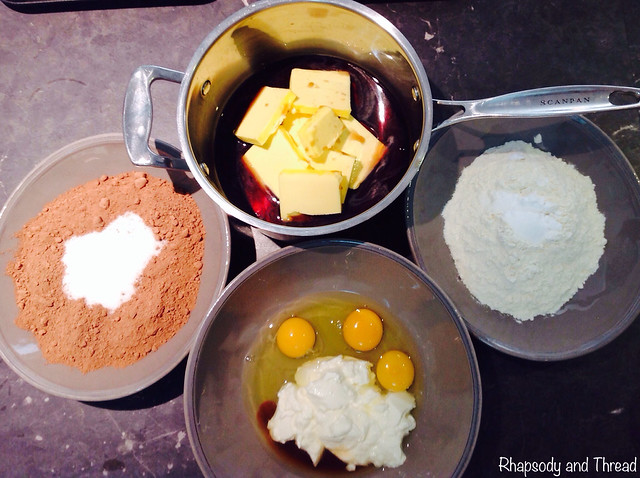
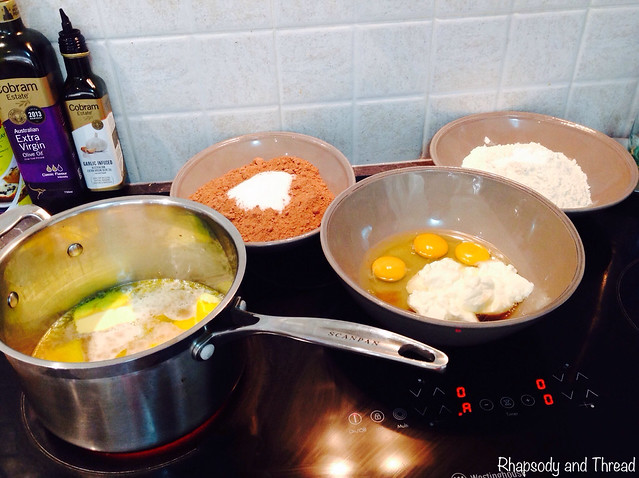
Ingredients List:

Easy No-Bake Mini Raspberry Cheesecakes With Fresh Raspberry and Gold Leaf Decoration by Rhapsody and Thread

For the biscuit base:

3 tbsp sugar

2 cups Digestive biscuit crumbs (approx. 18 biscuits so 1 box will do... with a few left for the kids. Crush to a fine sand consistency)

115g unsalted butter

For the filling:

250ml heavy/double cream

275g cream cheese, room temperature (approx. 1¼ blocks)

200g creme fraiche

⅔ cup icing sugar, sifted

For the raspberry sauce:

2 ½ tsp cornflour

3 tbsp sugar

⅓ cup water

350g frozen raspberries, thawed (I used a 300g box of Sara Lee frozen raspberries and 50g fresh raspberries)

For the garnish:

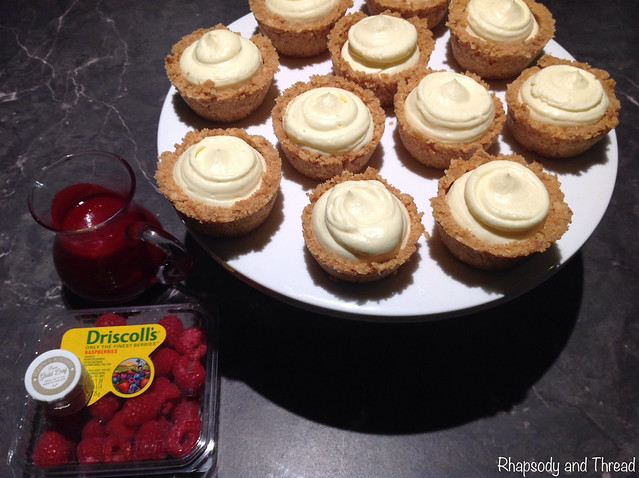
fresh raspberries, for garnish

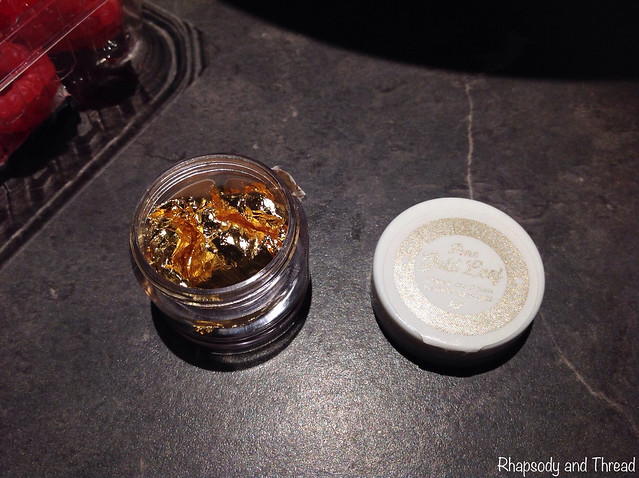
edible gold leaf, for sparkle


Instructions For The Biscuit Base:

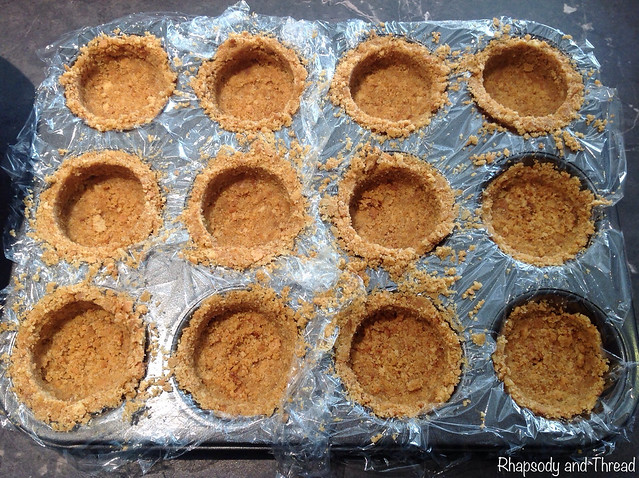
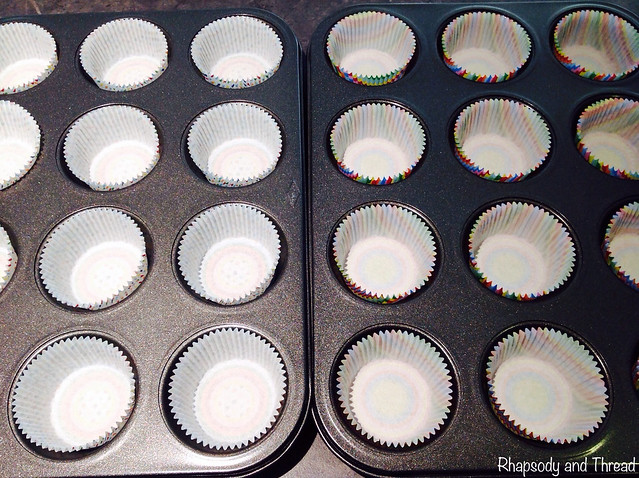
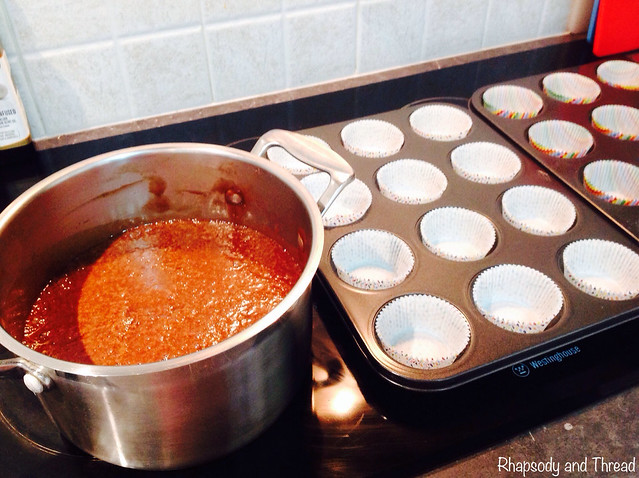
1. Line a 12-hole muffin tin with plastic wrap.

Easy No-Bake Mini Raspberry Cheesecakes With Fresh Raspberry and Gold Leaf Decoration by Rhapsody and Thread

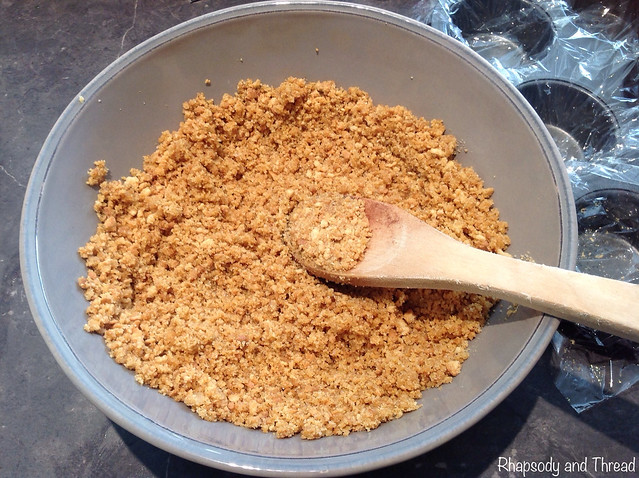
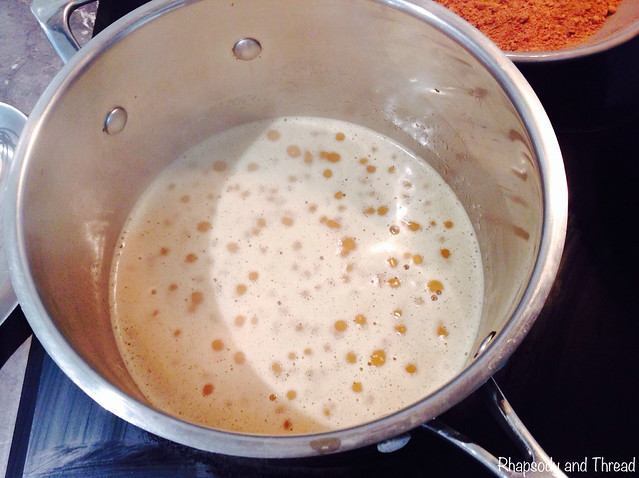
2. In a small bowl, combine the sugar and biscuit crumbs. Stir in the melted butter.

You want a wet sand consistency.

Easy No-Bake Mini Raspberry Cheesecakes With Fresh Raspberry and Gold Leaf Decoration by Rhapsody and Thread

3. Divide the mixture among the prepared muffin holes. Press mixture into each well forming a small cup.

I used a spoon to get the mixture up the sides and then found a very technical piece of equipment to squash and make a perfect cup --> a Nurofen For Kids 200ml bottle (most households would have one ;o)

Easy No-Bake Mini Raspberry Cheesecakes With Fresh Raspberry and Gold Leaf Decoration by Rhapsody and Thread

4. Place in freezer to chill while preparing filling.

Instructions For The Filling:

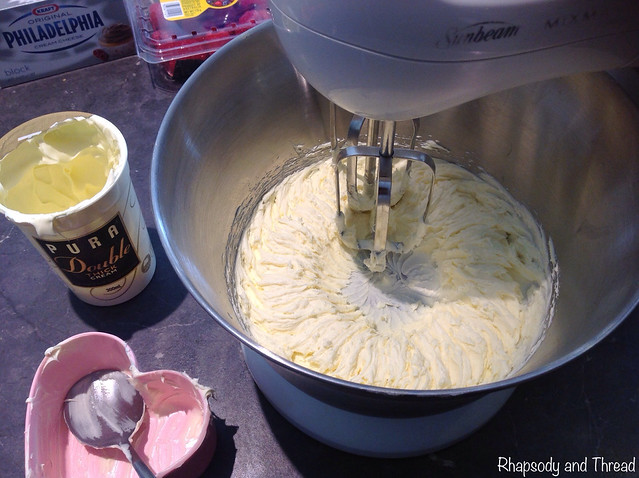
1. In an electric mixer fitted with the whisk attachment, beat the heavy cream on medium-high speed until medium-stiff peaks form.

I (sniff) don't have a fancy mixer with whisk attachment (sniff) but my trusty little K-Mart mixer did the job - and it didn't take long to get the stiff peaks (remember it's double cream and already quite thick).

Easy No-Bake Mini Raspberry Cheesecakes With Fresh Raspberry and Gold Leaf Decoration by Rhapsody and Thread

2. Transfer whipped cream to another bowl and set aside.

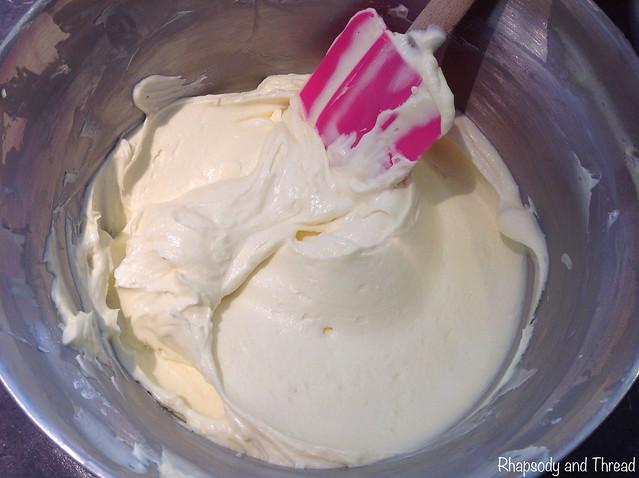
3. Return mixer bowl to mixer, switch to paddle attachment and beat the cream cheese, creme fraiche, and icing sugar on medium speed until combined.

Again, I didn't have a paddle attachment. My mixer did the job just fine.

4. Gently fold whipped cream into the cream-cheese mixture until combined.

Easy No-Bake Mini Raspberry Cheesecakes With Fresh Raspberry and Gold Leaf Decoration by Rhapsody and Thread

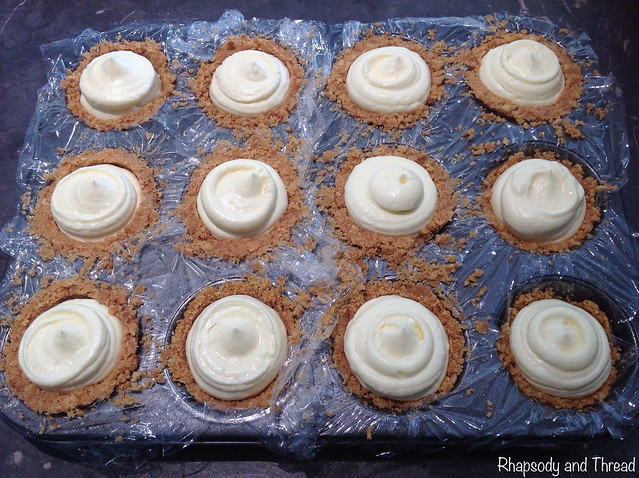
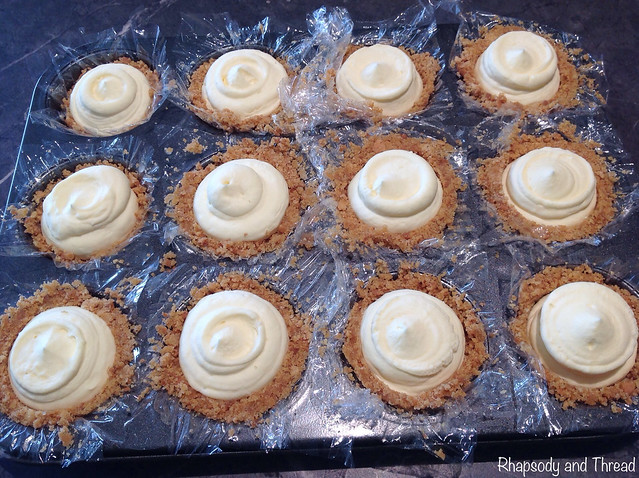
5. Spoon filling in to crusts and freeze until firm, about 30 minutes.

I found the biscuit base to be quite delicate, so I piped the mixture evenly in to the wells without disturbing the walls. If you don't have piping equipment, you can improvise by filling a snaplock bag and cut the tip off when you're ready to pipe. As you can see, they don't have to be perfect. Remember they are covered in raspberry sauce and topped with a fresh raspberry. And no one will care when they taste how delicious they are.

Easy No-Bake Mini Raspberry Cheesecakes With Fresh Raspberry and Gold Leaf Decoration by Rhapsody and Thread

6. While the cheesecakes are chilling, prepare the raspberry sauce.

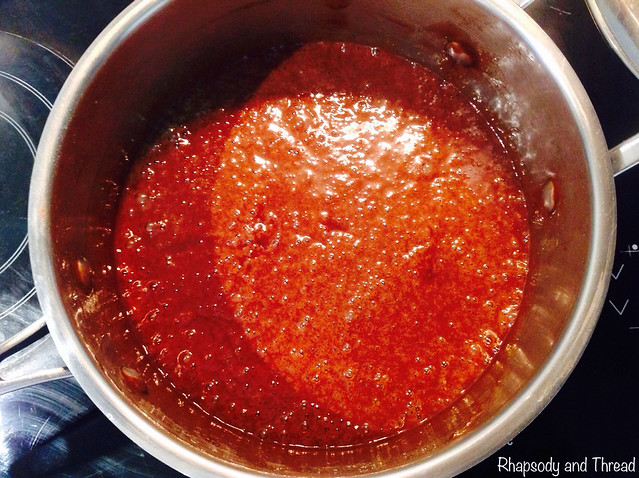
Instructions For The Raspberry Sauce:

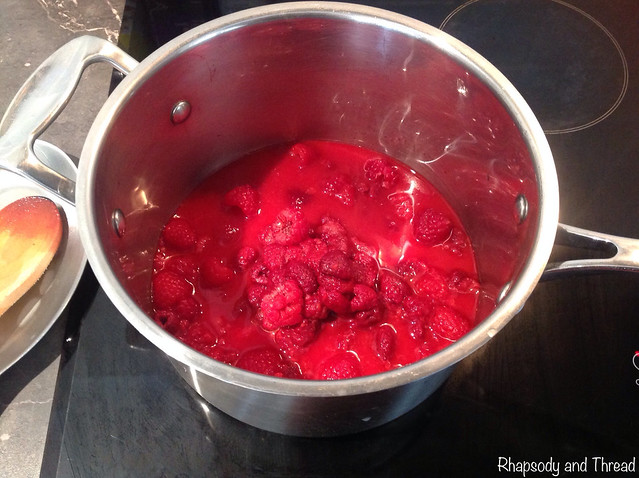
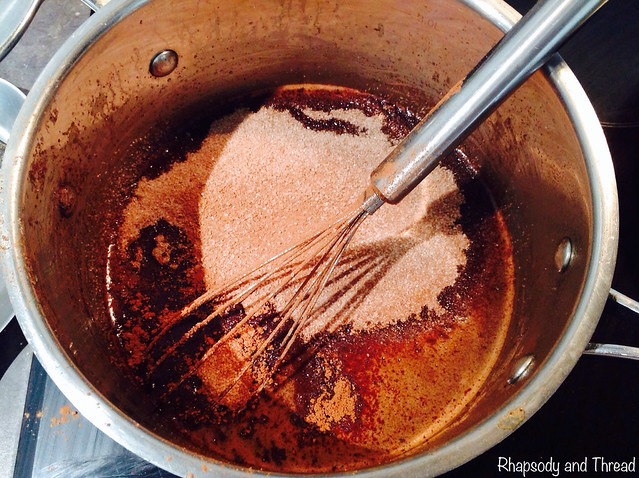
1. In a small saucepan, combine the cornflour, sugar and water.

2. Add the raspberries and cook over medium heat.

Easy No-Bake Mini Raspberry Cheesecakes With Fresh Raspberry and Gold Leaf Decoration by Rhapsody and Thread

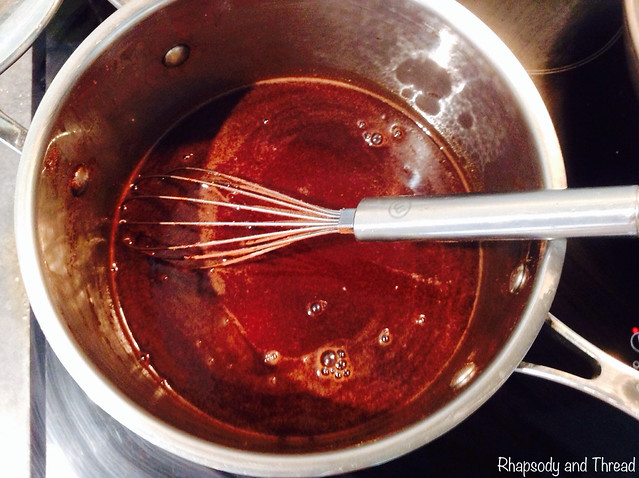
3. Stir constantly until the mixture boils.

Easy No-Bake Mini Raspberry Cheesecakes With Fresh Raspberry and Gold Leaf Decoration by Rhapsody and Thread

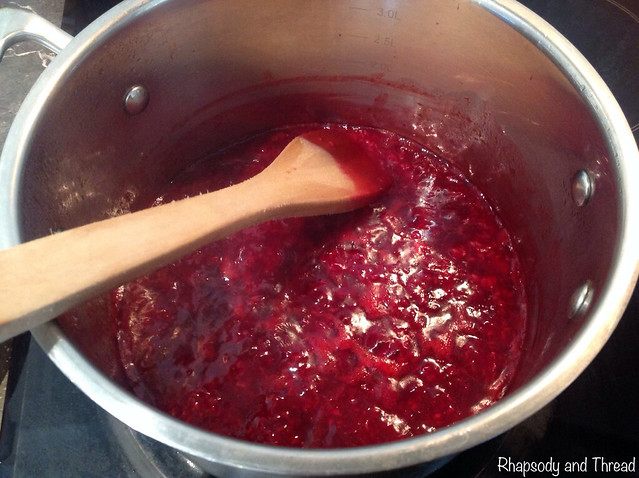
4. Once boiling, cook and stir for one additional minute.

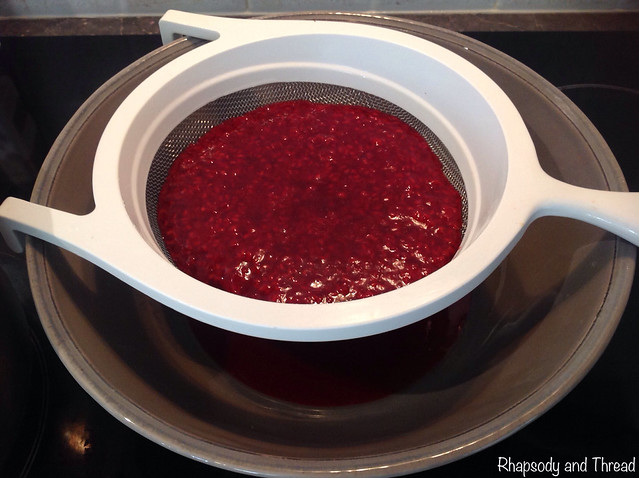
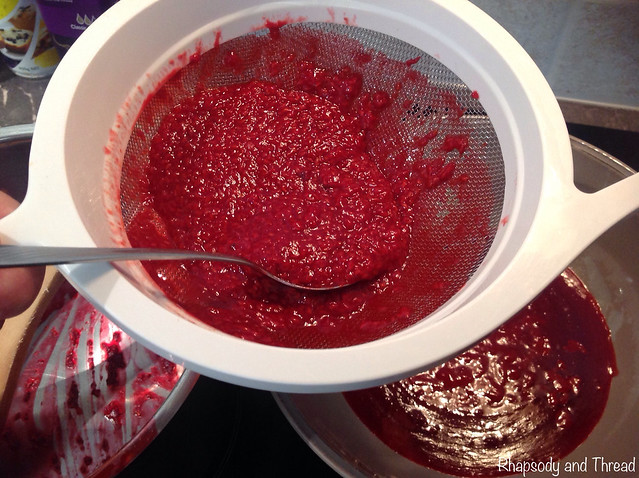
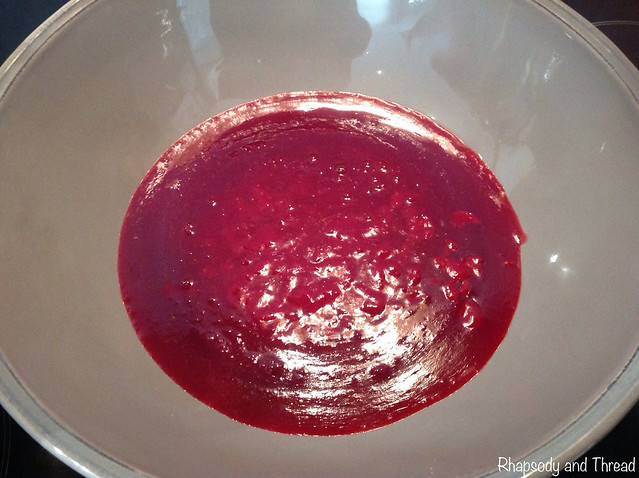
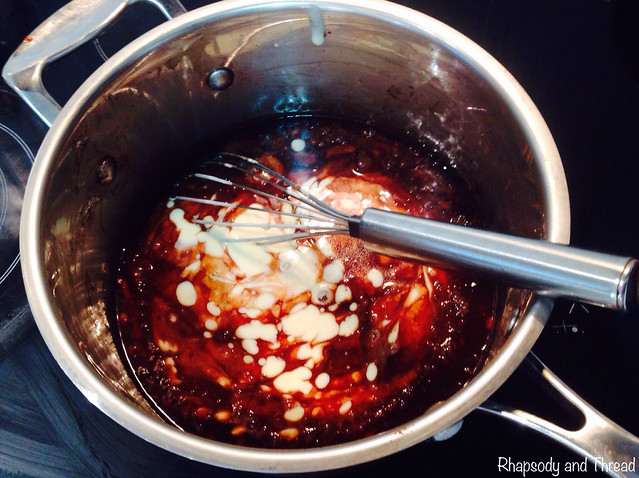
5. Strain the sauce through a fine mesh sieve placed over a bowl to remove seeds.

Easy No-Bake Mini Raspberry Cheesecakes With Fresh Raspberry and Gold Leaf Decoration by Rhapsody and Thread

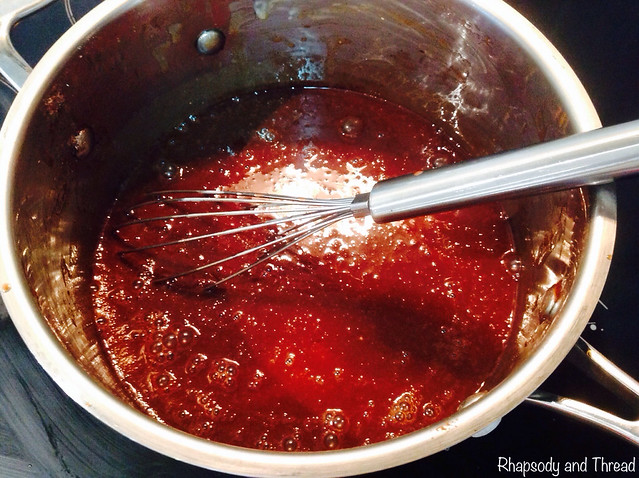
6. Cool to room temperature or chill in refrigerator until ready to serve.

Instructions For Decorating:

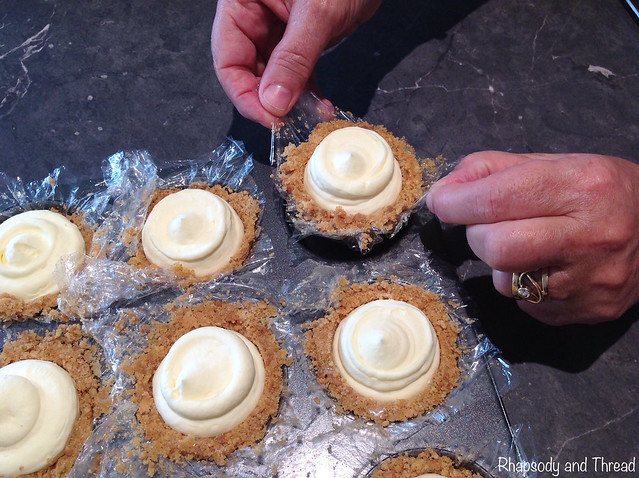
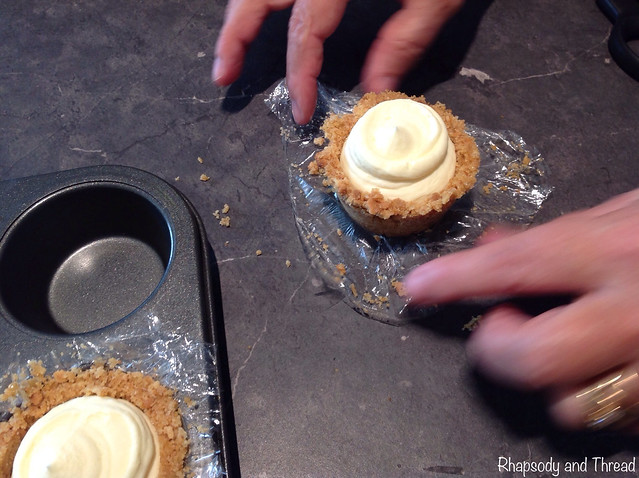
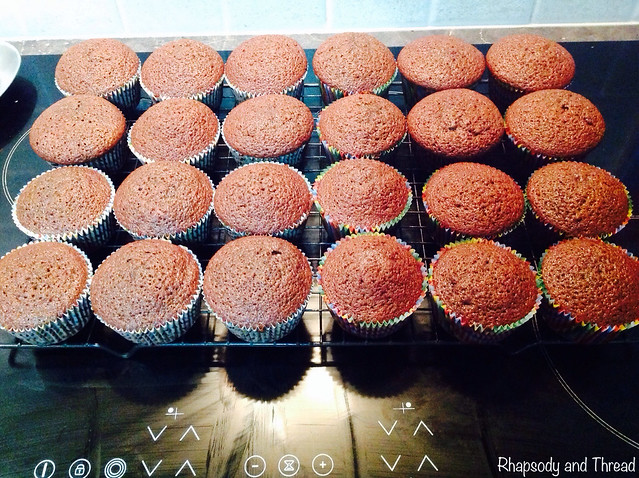
1. Remove cheesecakes from muffin tin by gently pulling up on the plastic wrap.

As you can see by the next photo, I cut channels around each of the cheesecakes to make it easier to lift them out.

Easy No-Bake Mini Raspberry Cheesecakes With Fresh Raspberry and Gold Leaf Decoration by Rhapsody and Thread

2. Remove from plastic and drizzle with raspberry sauce.

Easy No-Bake Mini Raspberry Cheesecakes With Fresh Raspberry and Gold Leaf Decoration by Rhapsody and Thread

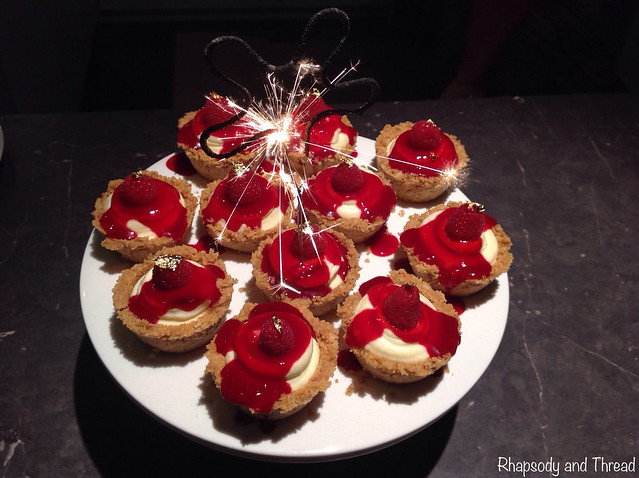
3. Garnish with fresh raspberries, as desired.

Easy No-Bake Mini Raspberry Cheesecakes With Fresh Raspberry and Gold Leaf Decoration by Rhapsody and Thread

I loved the look of the fresh raspberries poked on top after the sauce. I also added a smidge of edible gold leaf for a bit of sparkle. That stuff is interesting to work with so have tweezers ready ;o) Trust me.

Easy No-Bake Mini Raspberry Cheesecakes With Fresh Raspberry and Gold Leaf Decoration by Rhapsody and Thread

Yum, Yum, Yum.

These desserts are a great idea if you're entertaining a lot of people, because the cheesecakes can be made the day before.. The transfer them to the fridge a few hours before the party and let them sit in the fridge until you're ready to serve. Then just drizzle with sauce and top with a raspberry. It takes no time at all.

Easy to make. Easy to Serve. Even better the next day.

Give them a try.


Sunday 23 March 2014

There's A New Style Halter Dress In Town --> Treeyo

New Treeyo Halter Dress by Rhapsody and Thread

I thought I would share some photos of this gorgeous little dress I made for Isla a few nights ago.

I've wanted to make her a dress with pockets for AGES! She has always had this odd little habit of carrying small bits and bobs around. Her hands are never empty. It's never the same thing - but there's always something like a rock or a Dora figurine or a leaf or a sticker. So I just know that she'll get a real kick out of having pockets in her dress. It's a fun little perk and really pretty feature I think.

New Treeyo Halter Dress by Rhapsody and Thread

It still amazes me to see how this dress worked out. I'll tell you the story behind it. See, mum bought this fabric a few weeks ago. She only got a ¼ metre and I'm sorry she doesn't remember where from - it could have been either Calico & Ivy in Mosman Park or Patchwork At Homespun in Willagee. I will go hunting for it in the next few weeks because I want it for more items in my Etsy shop. So when I learn the name of the fabric and where to get it - I will let you know I promise.

So... what was I saying... oh yeah - mum only got a ¼ metre and it wasn't enough for a Halter Dress or a Halter Top for Isla :o( So I thought I would improvise and make her this new style Halter Dress with the gorgeous feature fabric as the front with coloured side panels.

I picked a hot pink Poplin from Spotlight on the right hand side.

New Treeyo Halter Dress by Rhapsody and Thread

And I made a sweet little pocket using a square with the purple flowers.

New Treeyo Halter Dress by Rhapsody and Thread

And I picked a bright light purple Poplin from Spotlight for the left hand side.

New Treeyo Halter Dress by Rhapsody and Thread

With a pocket made from a square of the fabric with hot pink flowers.

New Treeyo Halter Dress by Rhapsody and Thread

I kept the same shirring detail across the chest.

I love how it flares the rest of the dress out.

New Treeyo Halter Dress by Rhapsody and Thread

And I made halter straps from the matching Poplin fabric.

New Treeyo Halter Dress by Rhapsody and Thread

Scrumpy!

These will be coming soon to my Etsy shop. If you want to know when, like my Facebook Page. Or message/email me to request a custom order. I have an up-to-date Fabric Album on my Facebook Page if you want to DYO (design your own) dress. Just pick your front panel fabric and we can work out the best 2 side colours - you can decide what your little munchkin would like best. The price will vary depending on size and fabric choice (i.e. Designer or Premium Designer Fabric).

Thanks for reading xxo

Tabatha


Friday 21 March 2014

My Choc-Guinness Cupcakes With Cream Cheese Icing

I'm kind of doing my headless chicken routine like always with a big party around the corner - and this double birthday party for the kids is no exception. I have to-do lists everywhere and I know on one of them there is: Make Choc-Guinness Cupcakes! Now, it's early (party is still over a week away) but I'm making them to freeze (they thaw beautifully and still nice and moist) so that I can tick them off the list and move on to the other 500 jobs on my 200 to-do lists. And why not share this favourite recipe of mine that I make... well I used to make it all the time (before I had kids and had spare time to bake and cook and clean...) and people loved them - so they must be a hit ;o) Trust me they are!

This recipe is kind of famous from what I can see now searching on Google for it. I came across it years ago on the gorgeous cooking blog Smitten Kitchen. There was a bit of a craze going on about incorporating booze into sweet foods. Personally I don't think it should ever be discarded as a bad idea ;o) And these cupcakes are the proof. They are delicious. Here is the link to the original recipe.

And here is my interpretation for you all!

I've kind of streamlined the ingredients list and adjusted the instructions to suit how I make it. I think it's faster and easier - with the same yummy result. Oh and the icing recipe is mine - passed down from my mum. The Smitten Kitchen recipe has a Bailey's Buttercream but I'm not a big fan of buttercream. Trust me when I say that my Choc-Guinness Cupcakes with Cream Cheese Icing combo works... REALLY WELL ;o)

Ingredients List:

Choc-Guinness Cupcakes With Cream Cheese Icing by Rhapsody and Thread
1 cup/250ml Guinness (minimum can size is 440ml but I always have a willing assistant happy to help avoid wastage)
1 cup/250g unsalted butter
¾ cup unsweetened cocoa powder (Dutch-process is preferred but I always use the Bournville Cadbury Cocoa in my pantry ;o)
2 cups sugar
3 small eggs
⅔ cup sour cream
1 tsp vanilla
2 cups plain flour
1 ½ tsp bicarb soda/baking soda
¾ tsp salt

125g cream cheese
60g unsalted butter
½ cup icing sugar
½ tsp lemon juice
½ tsp vanilla extract (not essence)
½ tsp food colouring (if necessary)


Tools/Utensils:

Choc-Guinness Cupcakes With Cream Cheese Icing by Rhapsody and Thread
Soffritto Party Pack available from House $14.99
Measuring cups and spoons, whisk, rubber spatula
Sieve (ideally one with a handle and hooks so that it can be placed on top of your pot leaving your hands free)
3-4 mixing bowls
Medium-sized pot
Cupcake liners (24)
Baking trays (24 holes)
Mixer
Piping bags (if getting schmancy is the look you're after)

Cupcake Instructions:


Preheat oven to 180C (fan-forced).

Line baking trays with cupcake liners.

Choc-Guinness Cupcakes With Cream Cheese Icing by Rhapsody and Thread

In bowl 1: whisk cocoa and sugar to combine. Set aside.

In bowl 2: whisk eggs, vanilla, and sour cream to smooth consistency. Set aside.

In bowl 3: whisk flour, bicarb soda, and salt. Set aside.

In pot: add Guinness and butter.

Choc-Guinness Cupcakes With Cream Cheese Icing by Rhapsody and Thread

Place pot on medium heat.

And get your bowls (lined up in order) and utensils ready to work.

Choc-Guinness Cupcakes With Cream Cheese Icing by Rhapsody and Thread

Bring Guinness and butter to a simmer.

Choc-Guinness Cupcakes With Cream Cheese Icing by Rhapsody and Thread

Sieve bowl 1's ingredients gradually and whisk until mixture is smooth and glossy.

Choc-Guinness Cupcakes With Cream Cheese Icing by Rhapsody and Thread

Turn off the heat and cool slightly (10-15 minutes --> I did the dishes ;o)

Choc-Guinness Cupcakes With Cream Cheese Icing by Rhapsody and Thread

Whisk up the sour cream, eggs, and vanilla mixture and add to the pot.

Choc-Guinness Cupcakes With Cream Cheese Icing by Rhapsody and Thread

Sieve bowl 3's ingredients gradually to prevent lumps.

Give the mixture a good whisk to combine ingredients and get any lumps out.

Choc-Guinness Cupcakes With Cream Cheese Icing by Rhapsody and Thread

Pour mixture evenly into your cupcake liners (no more than ¾ full).

Choc-Guinness Cupcakes With Cream Cheese Icing by Rhapsody and Thread

Pop in the oven for 15 minutes, rotating once if your oven cooks unevenly like mine.

Check using a skewer - cupcakes are cooked with the skewers comes out clean.

Cool cupcakes on a wire rack completely (tip: get icing ingredients out of the fridge if icing today).

Choc-Guinness Cupcakes With Cream Cheese Icing by Rhapsody and Thread

Taste test of course... to um... make sure they are cooked!

Ice when cupcakes are cold (then taste test again) or freeze for up to 3 months in an airtight container.


Icing Instructions: (I don't have any pictures yet because I've only made and frozen the cupcakes. I'll ice them closer to the party and then add the pics. Promise! With sparkles on top)

1. Bring cream cheese and butter to room-ish temperature. You just need them to soften enough to beat without blowing your mixer up.

2. Add to mixer bowl and beat slowly for 1 minute to combine.

3. Mix on medium/high for 2 minutes until light and fluffy.

4. Add icing sugar slowly and scrape the sides of the bowl down regularly to keep the sugar incorporated.

5. Add lemon juice and vanilla (and food colour if necessary).

6. Taste test of course (you can add more lemon juice for tang but remember that adding too much more liquid will affect the consistency).

7. Pipe pretty stars or smother the cupcakes with delicious icing. Sprinkle for sparkle.

8. Devour!

So that's all I've got for the moment. I made the cupcakes and just so you know - I have taste-tested and they are SO moist and delicious. I had to put them in the freezer to stop me from eating them all and having to make another batch tomorrow! I'll make the icing and share photos of that little adventure. And I promise to share photos of them all decorated and looking beautiful on the sweets table at the kids party xxo

Catchalata!